Saturday, October 15, 2011

Silverlight beginners

What is Silverlight?

Silverlight is a powerful cross-browser & cross-platform technology for building the next generation web experience & rich internet applications for the web. You can run Silverlight in most of all the popular browsers like Internet Explorer, Firefox, Chrome, Safari etc. Silverlight can run in various devices and operating systems like Windows, Apple Mac OS-X and Windows Phone 7. Using Silverlight you can create rich, visually stunning web applications like flash. Also you can create smooth animations using Storyboards; you can stream media over the net etc.
Silverlight web browser plug-in comes as free to install (approximately 4-5 MB in size). You can download the required plug-in from Microsoft Silverlight Site.

What are the System Requirements for installing Silverlight?

Minimum System Requirements for installing Silverlight plug-in is as follows:
PC Type Processor RAM Operating System
Windows PC 500 MHz or higher, x86 or x64 bit processor 128 MB Windows XP SP2+
Mac Power PC PowerPC G4 800 MHz or higher 128 MB Mac 10.4.8 or higher
Mac Intel-based Intel Core Duo 1.83 GHz or higher 128 MB Mac 10.4.8 or higher

Silverlight also supports Linux PCs. The plug-in name for Linux operating system is Moonlight and you can get the information about it in Mono Project's Moonlight site (http://www.mono-project.com/Moonlight).

Minimum System Requirements for installing Silverlight SDK for development is as follows:
If you are a developer and want to start working on it, you must need the following environment to install the Silverlight tools.
Operating System - Microsoft Windows XP Service Pack 2 or higher
Developer Tools - Visual Studio 2008 SP1 (for Silverlight 3)
- Visual Studio 2010 (for Silverlight 3 & Silverlight 4)
Designers Tools - Microsoft Expression Blend 3 (for Silverlight 3)
- Microsoft Expression Blend 4 (for Silverlight 3 & Silverlight 4)
Silverlight SDK - Silverlight 3 Tools for Visual Studio 2008 SP1
- Silverlight 4 Tools for Visual Studio 2010


How can I know whether Silverlight is installed in my PC?

If you are not sure whether Silverlight is already installed in your PC, just go to the Microsoft Silverlight Installation Page (http://www.microsoft.com/getsilverlight/get-started/install/) and that will tell you whether the plug-in is already installed or you need to install.


What are the Prerequisite to create a new Silverlight Application?

Before starting with the Silverlight application development be sure you have all the necessary softwares installed in your PC. If you don’t have then follow the steps mentioned in Microsoft Silverlight Site (http://silverlight.net/getstarted/) to download & install the following items in your development environment:
  • Visual Studio 2008 SP1 for Silverlight 3 application development or Visual Studio 2010 for Silverlight 3 & Silverlight 4 application development
  • Silverlight 3 Tools for Visual Studio 2008 SP1 or Silverlight 4 Tools for Visual Studio 2010
  • Expression Blend 3 for Silverlight 3 or Expression Blend 4 Preview for Silverlight 4 (optional)
  • WCF RIA Services for Silverlight (optional)
  • Silverlight 3 Toolkit or Silverlight 4 Toolkit based on your earlier version of Silverlight (optional)
Remember that, Silverlight 3 comes preinstalled with Visual Studio 2010 and hence if you are using Visual Studio 2010, you don’t need to install the Silverlight 3 Tools for it. Using Visual Studio 2010 you can develop both Silverlight 3 and Silverlight 4 applications but Visual Studio 2008 SP1 only supports Silverlight 3.

If you have proper development environment ready for Silverlight application you can proceed to the next chapter for creating our first simple Silverlight project. I am using Visual Studio 2010 RC and Silverlight 4 RC while writing these applications. Hence, the attached samples will not open in Visual Studio 2008.


What is XAML?

XAML stands for eXtended Application Markup Language. It is nothing but an XML file which is used to declaratively create the User Interface of the Silverlight or WPF applications. This XAML file generally rendered by the Silverlight plugin and displayed inside the browser window. When you compile your projects which includes XAML pages, those first converts into BAML (Binary Application Markup Language) and then rendered in the web browser window. Let use see a simple example of XAML here:


The above XAML is a typical example where I am creating a text using the TextBlock control by specifying different properties as attributes to the control for name, font-family, weight, text etc.

What is App.xaml file?

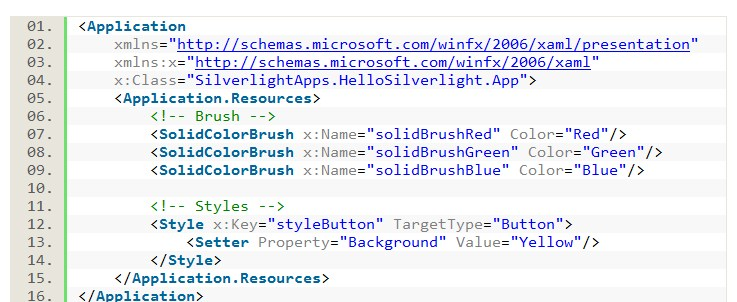
App.xaml file is the loader of your Silverlight Application. You can declare your shared/global resources, styles, templates, different brushes inside this file which will be accessible by your application.

A typical App.xaml file looks like: 


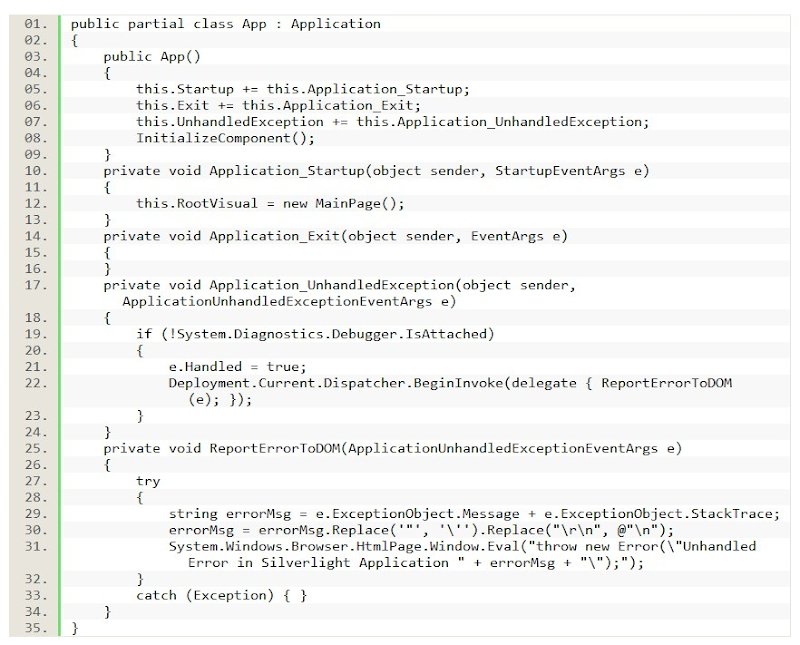
It has a code behind file too named as “App.xaml.cs”. This file is used to handle global application level events which you can use as per your need. Visual Studio creates these two files at the time of project creation. The three events inside the App.xaml.cs are:
  • Application_Startup
  • Application_Exit
  • Application_UnhandledException.
These three events are registered in the constructor of your App.xaml.cs file. Here is the code snippet of the same: 


Let us do a brief discussion on each part of the code file.
Overview of App Constructor: Inside the constructor of the App class you will find that all the three event has been registered. Also, there is a call to InitializeComponent() method. If you look around the whole class you will not find the method implementation. Strange!!! Where is the method?

The method has been implemented inside the partial class of the App class. If you go to the definition or just press F12 on top of the method, Visual Studio will open up the actual file named “App.g.i.cs” which contains the partial implementation of the same class. There you will find the method implementation.

What this method does: This method is responsible to load the XAML using the LoadComponent() method into the memory which can be used by your application.

What can we do inside the App.g.i.cs file: App.g.i.cs file is auto generated by the compiler and hence if you modify something there will be overwritten by the compiler itself on next build.

Why this file is not available inside my solution: As this is an compiler generated file, it has been placed inside the temporary directory named “obj”. If you go to the solution directory you will see the “obj” folder. Open it and browse through it’s subfolder (either debug or release) and you will see the file placed there. If you are unable to find it there, just do a rebuild of your solution and immediately it will be created there.

Overview of Application_Startup Event:
Application_Startup event is the root of your application. In this event you can create the instance of your initial page and set it as the RootVisual. Also, if you want to create some global objects or want to write some app initialization code, then this Application_Startup event will be the best part for you to implement it.

Overview of Application_Exit Event:
Similarly, you can write code to cleanup objects or do something when closing the application inside the Application_Exit event.

Overview of Application_UnhandledException Event:
If any exception comes while running and you didn’t handle that in the actual place, you can write some code in Application_UnhandledException to log the error details into database or show some message to the user. This will allow the application to continue running after an exception has been thrown. By default, if the app is running outside of the debugger then report the exception using the Browser DOM & the error will be visible in the status bar of Internet Explorer.


What is MainPage.xaml file?

When you create the Silverlight project, Visual Studio IDE will automatically add a default “MainPage.xaml” file which is actually a startpage for your Silverlight application. You can modify this page as per your need or can create a new one. So, what’s there inside the file? Lets look at it: 

 
Lets walk-through each lines of the code. It contains a UserControl as root of the file which may contain all other controls inside it. The following line tells the compiler to use the specified class to use:


The next couple of lines beginning with xmlns tells the compiler to import some namespaces which can be used by the Silverlight XAML page.

The following line speaks about the design time Height & Width of the Silverlight page:


If you want to specify actual Height & Width of your Silverlight application, you can manually append the following line inside that:


Next comes the Grid control which is used as a layout panel and that can include more other controls. Though the default XAML file uses the Grid as the layout panel, you can change it to any other panel as per your need. I will discuss about the various panel later in this tutorial.


“MainPage.xaml” has also it’s code behind file like App.xaml & you can use this to write code to develop your functionalities. By default, it comes empty with a call to Initialize() method inside the Constructor of the MainPage class. The implementation of this method is also available in a different partial class of MainPage inside “MainPage.g.i.cs” like “App” class. Whenever you add some controls inside the XAML page, it will be loaded here.

What is XAP file?

XAP (pronounced as ZAP) is the compressed output of the Silverlight Application which includes application manifest file, compiled output assembly and other resources used by your silverlight application. This uses the normal ZIP compression method to reduce the total download size. When you build your Silverlight application, it actually generates this .XAP file & puts in the output folder which the .aspx page refers as source to load the application.

Once you build your project, it will create the XAP file (in our case: SilverlightApps.HelloSilverlight.xap) and put it into the ClientBin directory of the web project. When the page loads it will pickup from the same location as the source you specified inside the aspx/html page.


How can I host a Silverlight Application?

When you create a Silverlight project, it asks you to create a Web Application project. This project is responsible for hosting your XAP file. Generally Silverlight application doesn’t require any server to host it to run, but if you are planning to host it in web you must need a web server for that.
Once you publish your Web Application to host in IIS, you may need to add three MIME types in your IIS Server. This is require to host it in earlier versions of IIS. Latest version of IIS comes with that configuration by default. Followings are the list of MIME Types those you need to add in your IIS Properties:

.xap application/x-silverlight-app
.xaml application/xaml+xml
.xbap application/x-ms-xbap

Silverlight Application (XAP) generally loads inside the ASPX or HTML pages pointing to the path to load the XAP. The aspx/html page uses <object /> tag to load the Silverlight application.

Here is the code present inside the aspx/html pages for loading the Silverlight XAP:


Let us go line by line to learn the basics of it.
  • In the first line <object> tag tells the browser to load the Silverlight plug-in.
  • Next couple of lines uses <param> tag.
    • The first param “source” has the value to the location of the .xap file.
    • Second param “onError” tells the plug-in to call the javascript method mentioned in the value, if any application error occurs.
    • The third param “background” specifies the color of the Silverlight application background.
    • The next param “minRuntimeVersion” specifies the minimum required plug-in version to load your Silverlight application.
    • If “autoUpgrade” is set as true in the next param, it will automatically upgrade the runtime.
  • The next lines are very interesting. Whatever you design there, will not be visible in the browser in normal scenarios. If the user doesn’t have Silverlight runtime installed in his PC or the Silverlight plug-in is disabled this section will visible to the user. This part is well known as “Silverlight Installation Experience panel”. By default, it shows a Silverlight image to download the runtime from Microsoft site. When the user clicks on it, this starts the installation. I will discuss about the Silverlight Experience later in depth.

How to Create a Simple Silverlight application

Prerequisites

QuickStart

If you want to see the end result of this tutorial and you have installed all the prerequisites, then please download the ZIP file below, unzip it, deploy it to a web sever, and navigate to sloob.html in your browser.
You can also see it in action, here.
Step 1: Create the HTML & JS files
The HTML file, named sloob.html, will look the same as usual, but it now references the new Silverlight.js file found in the Silverlight 3.0 SDK Tools directory.

<!DOCTYPE html PUBLIC "-//W3C//DTD XHTML 1.0 Strict//EN" "http://www.w3.org/TR/xhtml1/DTD/xhtml1-strict.dtd">
<html xmlns="http://www.w3.org/1999/xhtml" xml:lang="en">
     <head>
          <title>Silverlight Out-of-Browser Test</title>
          <script type="text/javascript" src="Silverlight.js"></script>
          <script type="text/javascript" src="createSilverlight.js"></script>
      </head>
      <body>
          <div id="silverlightControlHost">
          </div>
          <script type="text/javascript">
                // Find the div by id
                var hostElement = document.getElementById("silverlightControlHost");

                  // Create the Silverlight control
                createSilverlight(hostElement);
           </script>
      </body>
</html>
The Javascript file, createSilverlight.js, contains two key changes: a version number updated for Silverlight 3 and a flag to disable auto upgrade.

//creates the silverlight control within the tag specified by controlHostId

function createSilverlight( controlHost )
{
    Silverlight.createObjectEx({
        source: "ClientBin/SloobApplication.xap",
        parentElement: controlHost,
        id: "silverlightControl",
        properties: {
            width: "500",
            height: "350",
            version: "3.0.40307.0",
            background: "white",
            isWindowless: "true",
            enableHtmlAccess: "true",
            autoUpgrade: "false"
        },
        events: {}
    });
}
The “autoUpgrade” flag instructs Silverlight to try and automatically upgrade a user’s Silverlight run-time if they’re running a lower version than the one specified. For the Silverlight 3 Beta, we leave this set to false to avoid the “infinite install loop” as detailed by Tim Heuer at Method of Failed.
Step 2: Create the XAML file
The XAML consists of several TextBlocks that display the launch location, running state and network status of the application, a modifiable network connection validity URL inside a TextBox and buttons to initiate a network status check and desktop install. The usage of these components will become clear as you read through the tutorial, but for now, create a file named “SloobControl.xaml” and put this code in it:

<UserControl xmlns="http://schemas.microsoft.com/winfx/2006/xaml/presentation" xmlns:x="http://schemas.microsoft.com/winfx/2006/xaml" x:Class="SloobApplication.SloobControl">
    <Grid>
        <Grid.RowDefinitions>
            <RowDefinition Height="40" />
            <RowDefinition Height="40" />
            <RowDefinition Height="40" />
            <RowDefinition Height="40" />
            <RowDefinition Height="30" />
            <RowDefinition Height="30" />
        </Grid.RowDefinitions>
        <Grid.ColumnDefinitions>
            <ColumnDefinition Width="130" />
            <ColumnDefinition Width="300" />
        </Grid.ColumnDefinitions>

        <TextBlock Text="Launch Location:" Width="110" Height="35" Grid.Column="0" Grid.Row="0" />
        <TextBlock Text="Running State:" Width="110" Height="35" Grid.Column="0" Grid.Row="1" />
        <TextBlock Text="Network Status:" Width="110" Height="35" Grid.Column="0" Grid.Row="2" />
        <TextBlock Text="Network Status Url:" Width="110" Height="35" Grid.Column="0" Grid.Row="3" />

        <TextBlock x:Name="LaunchLocation" Text="" Width="280" Height="35" Grid.Column="1" Grid.Row="0" />
        <TextBlock x:Name="RunningState" Text="" Width="280" Height="35" Grid.Column="1" Grid.Row="1" />
        <TextBlock x:Name="NetworkStatus" Text="" Width="280" Height="35" Grid.Column="1" Grid.Row="2" />
        <TextBox x:Name="NetworkStatusUrl" Text="" Width="280" Height="25" Grid.Column="1" Grid.Row="3" />
        <Button x:Name="CheckNetworkStatus" Content="Check Network Status" Click="OnCheckNetworkStatusClicked" Width="280" Height="25" Grid.Column="1" Grid.Row="4" />
        <Button x:Name="Install" Content="Install" Click="OnInstallClicked" Width="280" Height="25" Grid.Column="1" Grid.Row="5" />
    </Grid>
</UserControl>
Now let’s put these components to use.
Step 3: Add location detection logic
We start with a class named SloobControl in “SloobControl.xaml.cs”:

namespace SloobApplication
{
    using System;
    using System.IO;
    using System.Net;
    using System.Net.NetworkInformation;
    using System.Text;
    using System.Windows;
    using System.Windows.Controls;
    using System.Xml;
    using System.Xml.Linq;

    public partial class SloobControl : UserControl
    {
        public SloobControl()
        {
                    InitializeComponent();
        }
    }
}
To this class, we’ll add a new function named DetectLocation which contains our location detection logic:

        private void DetectLaunchLocation()
        {
            if( Application.Current.ExecutionState == ExecutionStates.RunningOnline )
            {
                LaunchLocation.Text = "Launched in a browser.";
            }
            else if( Application.Current.RunningOffline )
            {
                LaunchLocation.Text = "Launched from the desktop.";
            }
            else if( Application.Current.ExecutionState == ExecutionStates.Detached )
            {
                LaunchLocation.Text = "Launched in browser.";
            }
        }
At first glance, this code appears deceptively simple. It checks the state of a couple of application variables and updates the appropriate TextBlock. The confusion comes in knowing which variable to check for the status you want to know. The ExecutionState property in the first if branch will contain different values that change over time depending on whether or not the application gets installed on the desktop. Here, ExecutionState will equal ExecutionStates.RunningOnline if the user launches the Silverlight application from the browser AND does NOT have it installed on the desktop. If the user launches the application from the desktop, then the RunningOffline property will equal true and the code takes the second branch. If the user launches the Silverlight application in a browser AND they DO have it installed on the desktop, Silverlight considers it Detached and the code falls to the last branch. This means that if the user has a Silverlight application installed, the Silverlight runtime will ALWAYS load the application from disk cache rather than downloading it from the web server irrespective of how the user access it (either from the desktop or the web browser). I find this peculiar…why not just access the latest version from the browser in that case? We’ll see if that behavior makes it into the final Silverlight 3 runtime.
We should detect the launch location on load, so let’s add a call to DetectLocation in the constructor:

        public SloobControl()
        {
                    InitializeComponent();

                    DetectLaunchLocation();
        }
Knowing how a user launched a Silverlight application doesn’t tell everything because the execution state of a Silverlight application can change over time. So, let’s track that.
Step 4: Add running state logic
Similar to the previous step, let’s add a function called DetectRunningState:

    public partial class SloobControl : UserControl
    {
        private bool detaching = false;

        public SloobControl()
        {
        ...
        }

        private void DetectRunningState()
        {
            if( Application.Current.ExecutionState == ExecutionStates.RunningOnline )
            {
                RunningState.Text = "Running in browser.";
            }           
            else if( Application.Current.ExecutionState == ExecutionStates.Detaching )
            {
                this.detaching = true;
                RunningState.Text = "Detaching from browser.";
            }
            else if( Application.Current.ExecutionState == ExecutionStates.Detached )
            {
                if( this.detaching )
                {
                    this.detaching = false;
                    RunningState.Text += "...complete.";
                }
                else
                    RunningState.Text = "Running from cache.";
            }
            else if( Application.Current.ExecutionState == ExecutionStates.DetachedUpdatesAvailable )
                RunningState.Text = "Running from cache but updates are available.";
            else if( Application.Current.ExecutionState == ExecutionStates.DetachFailed )
                RunningState.Text = "Unable to detached from browser.";
        }
More conditional logic, yay! The first branch should look familiar. Here, an execution state of ExecutionStates.RunningOnline means the Silverlight application currently runs in the browser (note, in this function RunningState TextBlock gets updated with the current execution state text). The code reaches the next branch that checks for ExecutionStates.Detaching whenever the user triggers a desktop installation of the application. By setting the “detaching” variable to true, the next branch which looks for ExecutionStates.Detached will know if a desktop install just completed or if the application launched from the cache (remember, the application will ALWAYS launch from the cache if the user has it installed on the desktop, even if they navigate back the the original site they installed the application from). Application.Current.ExecutionState will equal ExecutionStates.DetachedUpdatesAvailable when the Silverlight application runs from the cache, but the runtime detects updates to the application’s XAP file. Tim Heuer wrote an execllent article that walks through the Silverlight offline update logic on his Method of Failed blog, but in essence the Silverlight runtime sends an HTTP request with the If-Modified-Since header populated. If it gets back an HTTP response of 304 Not Modified, then it assumes it has an up-to-date XAP file. And finally, for completeness, the final branch notifies the user if an attempted detach (i.e. an attempt to install the application to the desktop) failed.
If the execution state changes over time, that means Silverlight must send us a notification when a change occurs. This happens when the Silverlight runtime raises the Application.Current.ExecutionStateChanged event. So, we should add code to respond to this event, like so:

    public partial class SloobControl : UserControl
    {
        private bool detaching = false;
        private bool checkingNetwork = true;

        public SloobControl()
        {
            InitializeComponent();

            Application.Current.ExecutionStateChanged += OnExecutionStateChanged;
           
            DetectLaunchLocation();
            DetectRunningState();
        }

        void OnExecutionStateChanged(object sender, EventArgs e)
        {
            DetectRunningState();
        }
The first highlighted line in the constructor shows where the OnExecutionStateChanged gets added to the ExecutionStateChanged event. Since this event doesn’t raise on initialization, I also added a call to DetectRunningState. Finally, the OnExecutionStateChanged function does nothing more than call DetectRunningState itself.
Now for the hard part. ;)
Step 5: Add network status logic
As Peter Smith noted in his Silverlight presentation at Mix ‘09 to insure that your Silverlight application has access to the Internet you should actually attempt to download and verify bits. He also wrote two articles for the Network Class Library Team blog for general online/offline detection in .NET and different code patterns to use for offline detection in Silverlight. For simplicity, I will only implement a bare bones method here, so I urge anyone needing to implement this feature to read both of these posts.
Like usual, let’s start with a function named DetectNetworkStatus:

    public partial class SloobControl : UserControl
    {
        private const string defaultUrl = "http://www.dieajax.com/downloads/tutorial/silverlight/sloob/test.xml";
        private WebClient webClient = new WebClient();
        private bool checkingNetwork = true;

        public SloobControl()
        {
            InitializeComponent();

            NetworkStatusUrl.Text = defaultUrl;
         
            ...
        }

        private void DetectNetworkStatus()
        {           
            bool networkAvailable = NetworkInterface.GetIsNetworkAvailable();

            if( networkAvailable )
            {
                NetworkStatus.Text = "Determining network status...";

                string networkStatusUrl = NetworkStatusUrl.Text + "?FoolCache=" + DateTime.Now.ToString();
                webClient.DownloadStringAsync(new Uri(networkStatusUrl , UriKind.Absolute));
                this.checkingNetwork = true;
                CheckNetworkStatus.Content = "Cancel Network Status Check";
            }
            else
                this.ShowNetworkStatus( false, null );
        }

        private void ShowNetworkStatus( bool online, String additionalInfo )
        {
            if( online )
                NetworkStatus.Text = "Connected to network.";
            else
                NetworkStatus.Text = "Disconnected from network.";

            if( additionalInfo != null )
                NetworkStatus.Text += "\n" + additionalInfo;
        }
The call to NetworkInterface.GetIsNetworkAvailable checks for network connectivity, and if it returns true, then the DownloadStringAsync function of the WebClient class attempts to download the resource at the URL in the “NetworkStatusUrl” TextBox. Being an asynchronous call, DownloadStringAsync returns immediately and for tracking purposes the “checkingNetwork” variable gets set to true and the “CheckNetworkStatus” button text changes to let the user know that another button press will cancel the asynchronous download currently in progress.
You may have noticed the “FoolCache” get variable appended to the URL before the call to DownloadStringAsync. Like checking the XAP file for updates, for efficiency’s sake, the browser sets the If-Modified-Since header when doing the HTTP call to the URL. If the file hasn’t changed, the browser just pulls the file from its cache and hands it to Silverlight. However, it appears my web server doesn’t respect that, meaning that even if I change the file on the web server, the browser, and thus Silverlight, will continue to pull the file from the cache. As recommened by Microsoft employee, I attempted to manually set the If-Modified-Since HTTP header to a much older value, forcing the browser to always think a newer file exists on the server, but I got a “restricted header” exception from the WebClient class. Finally, I decided to use a unique URL every time via the “FoolCache” HTTP GET parameter which, while being more hack-ish, also fools the browser into always getting the file. A few others have implemented a similar solution:
I should also note that I couldn’t get the XAP file auto-update working either because it uses the same mechanism. In the future, I hope Microsoft will give developers an easy way to customize when to update an installed Silverlight application.
Finally, the ShowNetworkStatus function simply wraps some common display logic.
When the WebClient finishes downloading or cancels a download, it raises an event that we should handle:

        public SloobControl()
        {
            ...
            webClient.DownloadStringCompleted += new DownloadStringCompletedEventHandler(OnDownloadStringCompleted);
            ...
        }

        private void OnDownloadStringCompleted(object sender, DownloadStringCompletedEventArgs e)
        {
            if( !e.Cancelled )
            {
                if( e.Error == null )
                {
                    XDocument doc = XDocument.Parse( e.Result );

                    if( (doc != null ) && (doc.Element( "test" ) != null) )
                        this.ShowNetworkStatus( true, null );
                    else
                        this.ShowNetworkStatus( false, "Error retreiving verification data." );
                }
                else
                {
                    this.ShowNetworkStatus( false, "Error contacting verification site." );
                }
            }
            else
                NetworkStatus.Text = "Cancelled.";

            this.checkingNetwork = false;
            CheckNetworkStatus.Content = "Check Network Status";
        }
In the constructor, you can see that the OnDownloadStringCompleted function handles the DownloadStringCompleted event. This function first checks to see if the user cancelled the download operation. If not, it attempts to parse the XML data it should have gotten from the request. If it parses correctly, then it assumes it has a valid Internet connection and updates the display accordingly.
Step 6: Trigger network status checks
This application has three scenarios for when it should check network status:
  1. When the OS detectes a network address change
  2. On application start
  3. When the user clicks on the Check Network Status button
Let’s add code to handle each of these cases:

        public SloobControl()
        {
            ...
            NetworkChange.NetworkAddressChanged += OnNetworkAddressChanged;
            ...
            DetectNetworkStatus();
        }

        void OnNetworkAddressChanged( object sender, EventArgs args )
        {
            if( !this.checkingNetwork )
                DetectNetworkStatus();
        }

        void OnCheckNetworkStatusClicked( object sender, RoutedEventArgs args )
        {
            if( this.checkingNetwork )
            {
                webClient.CancelAsync();
            }
            else
            {
                DetectNetworkStatus();
            }
        }
The first line in the constructor adds the OnNetworkAddressChanged event handler to the NetworkChange.NetworkAddressChanged event that comes from the OS. If a network status check isn’t currently happening, the OnNetworkAddressChanged function simply delegates to the DetectNetworkStatus function we created in the previous step. If you refer back to the XAML, you will see that the “CheckNetworkStatus” button has a click handler funtion named OnCheckNetworkStatusClicked. This function first determines if the application has a network check in progress and if so, cancels it. If not, it just calls the DetectNetworkStatus function.
Step 7: Programmatically trigger an install
Of course, the user can always install any Silverlight application that has out-of-browser support by right-clicking on the application and selecting the “Install xxxx onto this computer” menu item, where “xxxx” represents the name of the applicaiton. However, Microsoft also provided a way to install applications programmatically. I should note that application install can only occur as a result of a user action, for example, a button press. Trying to install an application on the constructor won’t work. With that in mind, I added a button named “Install” in the XAML with a click event handler function named OnInstallClicked. The logic for that function looks like this:

        void OnInstallClicked( object sender, RoutedEventArgs args )
        {
            Application.Current.Detach();
        }
Thankfully, Microsoft made the install process very simple: one function call brings up a dialog box asking the user if they want to install your application. The actual install process looks a bit different depending on which operating system you use and Channel 9 has an excellent video showing the differences between installing Silverlight on Windows and Mac OS X.
Step 8: Build it
The sample code bundle contains the project file and all the support files needed to build this sample. The build file looks similar to the build file in my Silverlight MSBuild tutorial with the exception of a few changes to the project file and application manifest:
SloobApplication.csproj

<ItemGroup>
  <Reference Include="mscorlib" />
  <Reference Include="system" />
  <Reference Include="system.Core" />
  <Reference Include="System.Windows" />
  <Reference Include="System.Net" />
  <Reference Include="System.Xml" />
  <Reference Include="System.Xml.Linq" />
  <Reference Include="System.Windows.Browser" />
</ItemGroup>
.…
<Import Project="$(MSBuildExtensionsPath)\Microsoft\Silverlight\v3.0\Microsoft.Silverlight.CSharp.targets" />
The first few highlighted lines point out the assemblies I added for network, XML and LINQ support. The last highlighted line shows that the project now references the new Silverlight 3 build targets.
AppManifest.xml

<Deployment xmlns="http://schemas.microsoft.com/client/2007/deployment" xmlns:x="http://schemas.microsoft.com/winfx/2006/xaml">
    <Deployment.ApplicationIdentity>
        <ApplicationIdentity
            ShortName="SLOOB Test"
            Title="Silverlight 3 Out-Of-Browser Test">
            <ApplicationIdentity.Blurb>
        Tests out-of-browser functionality in Silverlight 3
            </ApplicationIdentity.Blurb>
        </ApplicationIdentity>
    </Deployment.ApplicationIdentity>

</Deployment>
The AppMainfest file contains the desktop installation magic. The Deployment.ApplicationIdentity tag tells the Silverlight runtime that this application supports out-of-browser deployment. The “ShortName” tag will appear when the user right-clicks on the application as I noted in the previous step. Since deployment only requires changes to the application manifest, you can enable Silverlight application for desktop installs without having to recompile. Way to go Microsoft!
You can build the application with this command:

"C:\WINDOWS\Microsoft.NET\Framework\v3.5\msbuild.exe" SloobApplication.csproj
Step 9: Run it
Normally, I test my Silverlight applications by simply opening the HTML file locally, but for this tutorial, XAP update checks and network status checks won’t work if you run it locally. Go ahead and play around with installing, launching and removing the application and watch how the text statuses change. For me, it remained very unintuitive at first, however, now I pretty much have a handle on how Silverlight works with cached/installed applications…and it almost kinda makes sense. 

Conclusion

So, that’s Silverlight out-of-browser support. To be honest, it feels a little last minute to me. Or perhaps Microsoft simply decided not to over reach and do the bare minimum to have feature parity with JavaFX. Although, I must admit my disappointment at not seeing any cool “drag to install” (no pun intended ) demos like I’ve seen for JavaFX. I assume Silverlight 3 won’t support functionality like this upon release, but hopefully it’ll come in a later version.
I did however discover something very promising while perusing the new Silverlight doucmentation: it looks like Microsoft finally realizes that people want to host Silverlight outside of the browser and will officially support this (to an extent). The Mono guys have focused on Silverlight “desklets” from day one, so I makes me happy to see Microsoft finally moving towards doing the same. Silverlight out-of-browser support definitely feels like a tacked-on, “checkbox” feature this release, but I remain excitied to see how it evolves in the future.
Share and Enjoy:

Database(CRUD operations ) with ASP.NET Web Service in Silverlight

This is the step-by-step tutorial for how to do database operations (Create, Retrieve, Update, Delete) with ASP.NET web service (asmx) in Silverlight 2 beta 1.

A few people asked me how to do database operations (CRUD) in Silverlight 2 (beta1). As I have some experiences in using Astoria in Silverlight 1.1 Alpha, I was thinking to use Astoria service in Silverlight 2. Unfortunately, Astoria Client add-on doesn’t work with Silverlight 2 (beta1) and Astoria team said that the next version will be available around the end of April. So, for now, I made this sample with normal ASP.NET web service for those who like to do CRUD operations in Silverlight 2.

Software Required

  • Silverlight 2 (beta1) (Please read this post if you don’t know where you can get those installers.)
  • Visual Studio 2008
  • SQL 2005 Express with Management Studio
Download : SL2WebSrv.zip (1.45 MB)
Screenshots
Silverlight 2
Fig: Retrieving data from ASP.NET web service and displaying those data in Silverlight Datagrid.
sl2-entry.jpg
Fig: Entry Form for adding new record to database from Silverlight 2 application

Creating the database in SQL 2005

Note: If you already know about how to create the database in SQL 2005, please skip and jump to next section.
Step 1: Open SQL Server Management Studio Express
SQL Server Management Studio Express - FREE edition
Step 2: Connect to SQL Server that you have installed on your local machine
Connect to Server
Step 3: Right-click on Database node from Object Explorer and Select “New Database”
New Database - SQL 2005
Step 4: Type your database name ( I named it “MyStore” in this sample) and Click “OK” button
create-new-database-small.jpg
Step 5: Right-click on Table node of the database that you have created and select “New Table”
New Table
Step 5: Create two columns called “ProductID(INT Identity PK)” and “ProductName”. Name the table “Products”
Structure of Products Table
Okay. That is all about creating new table in SQL 2005.

Creating the Silverlight 2 (beta1) project in Visual Studio 2008

  • Open VS 2008 and Create new Silverlight 2 project.
new-project-thumb.jpg
  • It will ask you whether you want to create ASP.NET project or HTML page to host Silverlight content. Just click “OK” button
add-silverlight-application.jpg
  • You will get two projects (ASP.NET and Silverlight) under one solution.
solution-explorer.jpg

Creating Web Service in ASP.NET project

  • Right-click on ASP.NET project node and Choose “Add New Item” as shown in picture below.
add-new-item.jpg
  • “Add New Item” dialog will be shown. Please choose “Web Service” item in that dialog.
add-new-item-detail-thumb.jpg
  • Give the name “ProductManager.asmx” to this web service and click “OK” button.
  • Go to web.config and Add the connection string as below under <configuration> in web.config. (Note: You have to add your connection string for SQL so that it might not be the same as mine.)
    1
    2
    3
    <connectionStrings>
    <add name="sqlConnectionString" connectionString="Data Source=MICHAELSYNC-PC\SQLEXPRESS;Initial Catalog=MyStore;Integrated Security=True"/>
    </connectionStrings>
  • Go to the ProductManager.asmx again. Uncomment [System.Web.Script.Services.ScriptService] at the top of Class
  • Write the four methods for CRUD operations. (I will show the code for retrieving data from SQL in this post. If you want to know about CUD operations, please download the sample and take a look at that asmx file.)
    1
    2
    3
    4
    5
    6
    7
    8
    9
    10
    11
    12
    13
    14
    15
    16
    17
    18
    19
    20
    21
    22
    23
    24
    25
    26
    27
    28
    29
    30
    31
    32
    33
    [WebMethod]
    public string RetrieveProduct(int productId) {
    try {
    SqlConnection _sqlConnection = new SqlConnection();
    _sqlConnection.ConnectionString = ConfigurationManager.ConnectionStrings["sqlConnectionString"].ToString();
    _sqlConnection.Open();SqlDataAdapter da = new SqlDataAdapter();
    da.SelectCommand = new SqlCommand("SELECT * FROM Products WHERE ProductID = " + productId.ToString().Replace("'", "''"), _sqlConnection);
     
    DataSet ds = new DataSet();
    da.Fill(ds);
     
    StringBuilder sb = new StringBuilder();
    sb.Append("<?xml version=\"1.0\" encoding=\"utf-8\" ?>");
    sb.Append("<Products>");
    foreach (DataRow dr in ds.Tables[0].Rows) {
    sb.Append("<Product>");
    sb.Append("<ID>");
    sb.Append(dr[0].ToString());
    sb.Append("</ID>");
    sb.Append("<Name>");
    sb.Append(dr[1].ToString());
    sb.Append("</Name>");
    sb.Append("</Product>");
    }
    sb.Append("</Products>");
    _sqlConnection.Close();
     
    return sb.ToString();
    }
    catch (Exception ex) {
    return string.Empty;
    }
    }
  • Go to the propertypad of ASP.NET project and set False to “Use dynamic ports” property.static-port.jpg
  • then, Build ASP.NET project.

Consuming ASP.NET web service in Silverlight 2 (beta1)

  • Right-click on the Reference node of Silverlight project. And choose “Add Service Reference” as shown in picture below.add-service-reference.jpg
  • The following dialog will be shown. Click “Discover” buttondiscover-thumb.jpg
  • (One web service will be shown in “Service:” panel after clicking “Discover” button.) Double-click on that one.discovering-webservice.jpg
  • It will show “ProductManager” service that we created in ASP.NET project
  • Change the namespace to “WebServiceProxy” and hit “OK” button
  • Now, you can start using web service from Silverlight project. I will show you how to retrieve the data from web service.
  • Please take a look at “ListingControl.xaml.cs. You will see the following code that retrieve the data from Web Service
    1
    2
    3
    4
    5
    6
    7
    8
    9
    10
    11
    void ListingControl_Loaded(object sender, RoutedEventArgs e) {WebServiceProxy.ProductManagerSoapClient productMgrSoapClient =
    new SL2WebSrv.WebServiceProxy.ProductManagerSoapClient();
     
    productMgrSoapClient.RetrieveProductsAsync();
    productMgrSoapClient.RetrieveProductsCompleted +=
    new EventHandler<SL2WebSrv.WebServiceProxy.RetrieveProductsCompletedEventArgs>(productMgrSoapClient_RetrieveProductsCompleted);
    }
    void productMgrSoapClient_RetrieveProductsCompleted(object sender, SL2WebSrv.WebServiceProxy.RetrieveProductsCompletedEventArgs e) {
    if (e.Error == null)
    displayData(e.Result);
    }
    Note: ListingControl_Loaded is attached in ListingControl constructor. displayData(string) is another function for showing data.
  • I created Product class in Silverlight project too. Because Silverlight doesn’t support binding Datagrid with anonymous type. (You can read about this issue more details in this post.)
  • The following code is for displayData() function.
    1
    2
    3
    4
    5
    6
    7
    8
    9
    10
    11
    12
    13
    14
    15
    16
    17
    18
    19
    20
    21
    22
    23
    24
    25
    26
    27
    28
    29
    void displayData(string xmlContent) {
    try {if (xmlContent != string.Empty) {
    XDocument xmlProducts = XDocument.Parse(xmlContent);
     
    var products = from product in xmlProducts.Descendants("Product")
    select new
    {
    ProductID = Convert.ToInt32(product.Element("ProductId").Value),
    ProductName = (string)product.Element("ProductName").Value
    };
     
    List<Product> productsList = new List<Product>();
     
    foreach (var p in products) {
    Product pdt = new Product { ProductID = p.ProductID, ProductName = p.ProductName };
    productsList.Add(pdt);
    }
    productsDataGrid.ItemsSource = productsList;
    }
    else {
    productsDataGrid.ItemsSource = null;
    }
     
    }
    catch (Exception ex) {
    Console.Write(ex.Message);
    }
    }
  • Yes. That’s all about retrieving data from Web Service. If you run that sample, the data from database will be displayed in DataGrid.
  • You can also read the code from EntryControl.xaml.cs file if you want to know how to insert the data.

How to run this sample

First thing that you need to do is that you should attach the database to your SQL express. After that, you have to change the connection string. then, try to run the sample. If you are not seeing anything then please try to uncomment the code for calling web service. (because I’m not sure whether you have the connection problem or not.) then, run it again. You should be able to see the silverlight content as shown in my screenshot except datagrid. If it’s running fine then try to check the connection string again.

Feel free to let me know if you have any problem or suggestion. I hope you will find it useful.

Difference between WPF and SilverLight

WPF:-
WPF is for desktop applications- you create an .exe file when you build WPF applications. To run a WPF exe requires you to have Framework 3 or higher on your pc.
Silver light:-
 Silverlight is on the web. What you create is an application that can be hosted either in an html page or an asp.net page. To watch it from your browser it requires to have installed in your browser the silverlight plugin. Silverlight uses very fewer libraries than WPF does, and that's pretty logical because silverlight's CLR is in the plugin which is about 5-10 MB.

In Another point of view:-
As both WPF and Silverlight increase in importance among .NET developers, the confusion about the difference between the two has also increased. Back in June Wintellect released a little known but incredibly important whitepaper on the topic simply titled Microsoft WPF-Silverlight Comparison Whitepaper. While we recommend GUI developers read all 69 pages, we offer you a summary of the major ones that impact line-of-business developers.
Dependency properties are a key component of both platforms, with PropertyMetadata being used to back properties instead of normal fields. While Silverlight only offers this one class, WPF has some subtypes.
  • UIPropertyMetadata adds a flag that determine “whether animations should be disabled on the dependency property where the containing metadata instance is applied.”
  • FrameworkPropertyMetadata adds flags to indicate the property affects the pipeline including control arrangement, measuring, rendering. It can also indicate whether or not data binding is allowed on the property and what type to default to. Since Silverlight doesn’t support this class, all data binding defaults to one-way.
Silverlight doesn’t support tunneling events. Both platforms support direct and bubbling events.
WPF supports several types of triggers. A basic trigger attaches to a dependency property and automatically applies style changes when the trigger condition is met. In addition to basic triggers, WPF also supports triggers that respond to routed events and triggers that work with data-binding. Instead of triggers, Silverlight uses a technology called Visual State Manager instead. WPF doesn’t currently offer this, but will in WPF 4.0.
Silverlight only supports a few markup extensions. In addition to the shared StaticResource, Binding, and TemplateBinding extensions, WPF adds DynamicResource, RelativeSource, x:Type, x:Static, and x:Array.
There are numerous keyboard and mouse events only available in WPF. As there are far too many to list here, we will defer to the full text.
UIElement class and the IInputElement interface. When a control is disabled, WPF uses this to disable all of the child controls. Silverlight doesn’t offer this behavior, so developers have to walk the control tree manually.
On the communication side, WCF in Silverlight is limited to BasicHttpBinding and PollingDuplexHttpBinding. WPF, of course, supports all of the available bindings.
Finally, printing is completely different in WPF and Silverlight. WPF allows the direct printing of visual trees while Silverlight relies on the browser.
 
Note:-

WPF and silverlight though use the same logic in development and the same technology.

Life Cycle Silverlight Application 4.0

The page life cycle of Silver light Application . The whole process is bellow.
  1. A User requests a Web page that hosts the Silverlight plug-in.
  2. If the correct version of Silverlight has been installed, the Web browser loads the Silverlight plug-in and creates the Silverlight content region. The plug-in then begins downloading your .xap file.
  3. The plug-in extract the contents of the .xap file and read the AppManifest.xaml file from the XAP to determine the assemblies your application uses.
  4. The plug-in loads the Silverlight core services and the Silverlight runtime environment (CLR) which then creates an Application Domain for your application.
  5. When the package is downloaded, the plug-in then loads your application assemblies and dependencies (if any) into the AppDomain. The CLR uses the metadata in .xap to instantiate your Application class and the default constructor of the Application class raises its Startup event.
  6. The Startup event handler is handled to display a user interface page and that is how you view your UI. This event occurs once the Silverlight plug-in has finished loading the .xap file. Once the UI is loaded, other events occur in response to user actions.

ASP.NET and Silverlight

There are many differences between ASP.net and Silverlight.
ASP.net generates the control (client side scripts to build UI) and send to client for rendering. It requires two processes, dynamic generation of code at server, rendering of server generated code at client inside the browser. Even the code is generated at server by ASP.net worker process, it gets executed as script on the client as it gets downloaded in form of script (html, CSS, js etc).
On other hand, Silverlight contains pre-compiled intermediate language code (MSIL) for controls and only create instance to display that. A single process of instantiation of control is sufficient to render the information in browser. All Silverlight codes are pre-compiled so loading is faster than ASP.net. It requires less data transfer between server and client. There are no "server round trip", no javascript, no Ajax.
Silverlight is just like a Flash app... A server file is request by the plug-in on client computer, your server sends this file (.xap for Silverlight) and the plug-in runs it locally.
ASP.NET is stateless and everything is executed and handled on the server-side, Silverlight is not stateless and everything that is executed is executed by default on the client-side, only when you make call to the server, code on the server-side will be executed. So no refresh, no reloading of pages, no page life cycle, ViewState, just a beautiful rich client that holds state;

Page Life Cycle

Remember that Silverlight is running on the client, not on the server as normal ASP.NET pages... there is no such as Page Life Cycle in Silverlight. But there are some events that will be executed on the client side in a specific order.
  1. First the App constructor in the App.xaml file.
  2. The App's Applicaiton_Startup event which will be executed every time you open your Silverlight app.
  3. The Main page's Constructor..  It will be the constructor of the page assigned to the RootVisual properly within the App's Application_Startup event.
  4. InitializeCompnent, only to make sure the components are singed to variables so you can use them. I hope this one will be removed in the future and be handled elsewhere.
  5. If you have hooked up to the Loaded event within the Main Page Constructor, that event will then be executed, same with the rest event listen in the order they will be executed if you have hooked up to them.
  6. Then the SizeChanged event.
  7. Then the LayoutUpdated event.
  8. Then GotFocus if you mark the Silverlight app.
  9. If you navigate from your Silverlight app or close the Browser the App's Application_Exit event will be executed.
As you may figure out, There is No Life Cycle. If you have a button control on the Silverlight app and press it, there will never we a post back, back to the server. The click event will just simply be fired of on the client-side; it's where the code is executed. To get data from a server, you can for use a WCF service, Web Service, Web Client, .NET RIA Services etc... They will make the call to the server from the client side for you.

Control Initialization Order

There are some subtle differences between instantiating a control in XAML, and instantiating it via code that I've called out, but most of the lifecycle is the same. Read more about Event Handling in Silverlight here
Action
Control instantiated in XAML
Control instantiated in code
Control ctor
As soon as begin tag is parsed.
When you call it.
Explicit Style applied
If the Style property is set in XAML, it will be applied as soon as the end tag is parsed.
As soon as Style property is set.
Built-in Style (from generic.xaml) applied
As soon as the end tag is parsed, after the explicit Style (if any) has been applied. Will not override explicit Style.
When the control enters the tree. Will not override explicit Style.
Properties set
When the attributes are parsed.
When you set them.
Loaded event
Posted when the element is been added to the tree. Fired before the next frame. Happens before layout.
Same.
Template applied (i.e. control's visual are created from the Template)
In the Measure pass of layout. The Template property will be applied if the control has no visual tree. The control starts life with no visual tree, and the visual tree will be cleared when the Template property is set. You can also call ApplyTemplate yourself.
Same.
OnApplyTemplate called
Whenever the Template is applied. It is not necessary to call the base OnApplyTemplate for the Template to be applied, but inherited types might be relying on it for their implementations.
Same.
Visuals first available
In OnApplyTemplate. Use GetTemplateChild.
Same.
MeasureOverride called
In the Measure pass of layout. If the Template was expanded during this Measure pass, MeasureOverride will be called after the Template has been expanded.
Same.
ArrangeOverride called
In the Arrange pass of layout, which occurs after the Measure pass.
Same.
SizeChanged event
After the Measure and Arrange passes have completed.
Same.
LayoutUpdated event
After SizeChanged events have fired.
Same.