When you want to export data, you can choose formats such as XML or csv for the data files. The XML format is more widely used for its flexibility and is desirable by many systems to be able to process the data. This article explains how to create xml files from C# classes.
Situation: Where would you use it:
- When you have to export data from one system to another system on a different platform
- When you have to setup scheduled jobs to export data
- When you want to keep a backup of key data on a regular basis. Though the database will give (better) alternatives, this technique will help you in shared hosting environments where you may want to keep a good backup of users who have signed up on your site, on a daily basis, for example.
This article touches the following technological aspects:
- C# class library
- Creating XML Schema (XSD)
- Generating C# Class file from XSD
- Generating XML files from C# object using XmlSerializer
 Example:
Suppose you have the following data which need to be exported in the form of XML files.
Customers:
CustomerID
CompanyName
ContactName
Address
City
PostalCode
Country
Phone
Fax
Each customer may have one-to-many Orders.
Orders:
OrderID
CustomerID
OrderDate
RequiredDate
ShippedDate
ShipAddress
ShipCity
ShipPostalCode
ShipCountry
To export this data on a daily basis, you would create XML files in the following format:
<Customers>
<CustomerID />
<CompanyName />
…
<Orders>
<OrderID />
<OrderDate />
…
</Orders>
<Orders />
<Orders />
…
</Customers>
<Customers />
<Customers />
…
Here are the steps to create it:
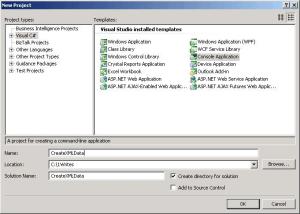
1) Create new project in Visual Studio
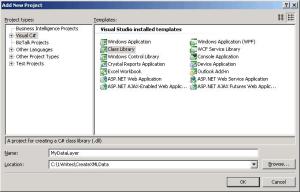
 2) Add a class library to the project
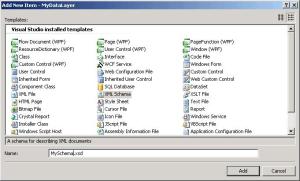
 3) Add a schema (.xsd) file to the class library project
 4) Add schema elements. There are different ways in which you can add elements. One simple way is to drag and drop the database tables from the server explorer into the .xsd’s design area (when MySchema.xsd is opened with XML Schema Editor).
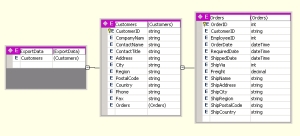
For this exercise, add Customers and Orders tables from the Northwind database from the server explorer.
The completed schema will look like this in the designer.
 See the project source code to view the XSD code (ie with XML tags)
5) Generate the C# Class from xsd
At the VS Command prompt, enter xsd /c MySchema.xsd. This will create MySchema.cs. Rename it to MySchemaClass.cs, add it to the MyDataLayer class library project, update the namespace of MySchemaClass.cs
If your schema’s top element is named ExportData, (<xs:element name=“ExportData“>) MyDataLayer class will have a class named ExportData (public partial class ExportData).
(I’ve also updated the OrderDate datatype to be string in the generated class, to produce a formatted output in the XML)
6) Create the object from ExportData class and fill the object’s properties with data (from Database or from any other source).
eg:
private ExportData _exportXmlData = new ExportData();
(See the source code for full details).
7) Use the XmlSerializer to create XML files
eg:
8 ) Run the project. It will create the XML files containing data, which can be exported (via ftp or saved directly to a shared drive).
A typical customer data in the XML file produced by this example will have the following format:
Feel free to comment your thoughts / questions / suggestions below.
Situation: Where would you use it:
- When you have to export data from one system to another system on a different platform
- When you have to setup scheduled jobs to export data
- When you want to keep a backup of key data on a regular basis. Though the database will give (better) alternatives, this technique will help you in shared hosting environments where you may want to keep a good backup of users who have signed up on your site, on a daily basis, for example.
This article touches the following technological aspects:
- C# class library
- Creating XML Schema (XSD)
- Generating C# Class file from XSD
- Generating XML files from C# object using XmlSerializer

Figure 1: Generate xml to export data
Suppose you have the following data which need to be exported in the form of XML files.
Customers:
CustomerID
CompanyName
ContactName
Address
City
PostalCode
Country
Phone
Fax
Each customer may have one-to-many Orders.
Orders:
OrderID
CustomerID
OrderDate
RequiredDate
ShippedDate
ShipAddress
ShipCity
ShipPostalCode
ShipCountry
To export this data on a daily basis, you would create XML files in the following format:
<Customers>
<CustomerID />
<CompanyName />
…
<Orders>
<OrderID />
<OrderDate />
…
</Orders>
<Orders />
<Orders />
…
</Customers>
<Customers />
<Customers />
…
Here are the steps to create it:
1) Create new project in Visual Studio

Figure: Creating New Project

Figure: Adding a class library to the solution

Figure: Adding schema file to the project
For this exercise, add Customers and Orders tables from the Northwind database from the server explorer.
The completed schema will look like this in the designer.

Figure: Customers and Orders schema
5) Generate the C# Class from xsd
At the VS Command prompt, enter xsd /c MySchema.xsd. This will create MySchema.cs. Rename it to MySchemaClass.cs, add it to the MyDataLayer class library project, update the namespace of MySchemaClass.cs
If your schema’s top element is named ExportData, (<xs:element name=“ExportData“>) MyDataLayer class will have a class named ExportData (public partial class ExportData).
(I’ve also updated the OrderDate datatype to be string in the generated class, to produce a formatted output in the XML)
6) Create the object from ExportData class and fill the object’s properties with data (from Database or from any other source).
eg:
private ExportData _exportXmlData = new ExportData();
(See the source code for full details).
7) Use the XmlSerializer to create XML files
eg:
FileStream fs = null;
try
{
XmlSerializer serializer = new XmlSerializer(typeof(ExportData));
{
XmlSerializer serializer = new XmlSerializer(typeof(ExportData));
fs = new FileStream(_fileName, FileMode.Create, FileAccess.Write);
serializer.Serialize(fs, _exportXmlData);
}
catch
{
throw;
{
throw;
}
finally
finally
{
if (fs != null)
{
fs.Close();
{
fs.Close();
}
}
(See the source code for full details).}
8 ) Run the project. It will create the XML files containing data, which can be exported (via ftp or saved directly to a shared drive).
A typical customer data in the XML file produced by this example will have the following format:
<Customers>
<CustomerID>2</CustomerID>
<CompanyName>Company Name 2</CompanyName>
<ContactName>Contact Name 2</ContactName>
<City>Dallas 2</City>
<Orders>
<OrderID>2000</OrderID>
<OrderDate>Tuesday, August 19, 2008</OrderDate>
<RequiredDate>2008-08-21T14:33:31.8125-05:00</RequiredDate>
<ShipName>UPS 2</ShipName>
</Orders>
<Orders>
<OrderID>2001</OrderID>
<OrderDate>Tuesday, August 19, 2008</OrderDate>
<RequiredDate>2008-08-21T14:33:31.8125-05:00</RequiredDate>
<ShipName>UPS 2</ShipName>
</Orders>
</Customers>Feel free to comment your thoughts / questions / suggestions below.
I sure would like to see the source code for this project.
ReplyDeleteThx